In this guide, we will discuss the Apache Spark setup in the docker container with detailed explanation of each step. This article will help you in setting the local development environment quickly.
We also have a brief guide on how to set up Apache Spark in Ubuntu and Redhat Linux.
REFERENCE: Steps to set apache spark in Ubuntu and Redhat linux
Why Apache Spark In Docker Container?
Developers often prefer to have an environment where they can write codes and spend some productive time. Setting up the development environment will mostly fall under the admin scope and there will be a separate admin team in your work environment to take care of.
In your local environment, the developers have to set up the spark single-node or multi-node cluster for development and testing activity. Manual setup for spark is a time-consuming process where you have to first spin up a VM, install Java binaries, download the spark with Hadoop packages, and finally set the necessary parameters to run the spark jobs.
With docker, you have two options.
- Use the existing spark image from the docker hub.
- Create spark image by creating the Dockerfile.
You can spin up the spark environment with just 2 commands if you choose to use an existing docker image from the docker hub.
You can also create a Dockerfile with a set of instructions to install apache spark and dependent libraries, create a new image and launch the container. You can then store the custom image in the docker hub or any other container registry. This way you can quickly pull the custom image in any machine to set up the spark environment.
Choosing Spark Docker Image From Docker Hub
You can use the docker hub or docker search command from cli to search for spark images.
- Navigate to the dockerhub website. Type spark in the search bar.
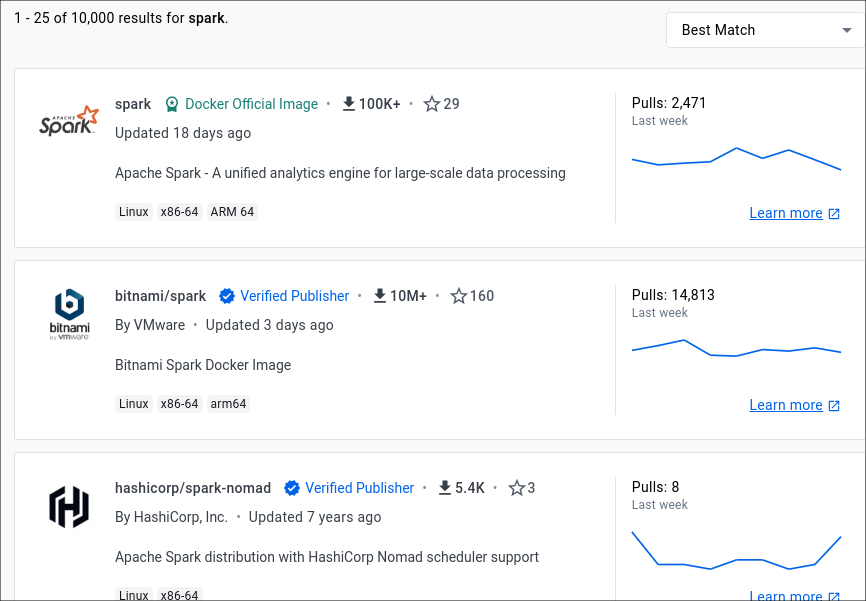
You will get a lot of images related to spark. Select all options under the Trusted Content to filter images that can be trusted. The image marked as “Docker Official Image” is the official spark image.
- You can run the following command from the cli, which will return the list of available spark images.
$ docker search spark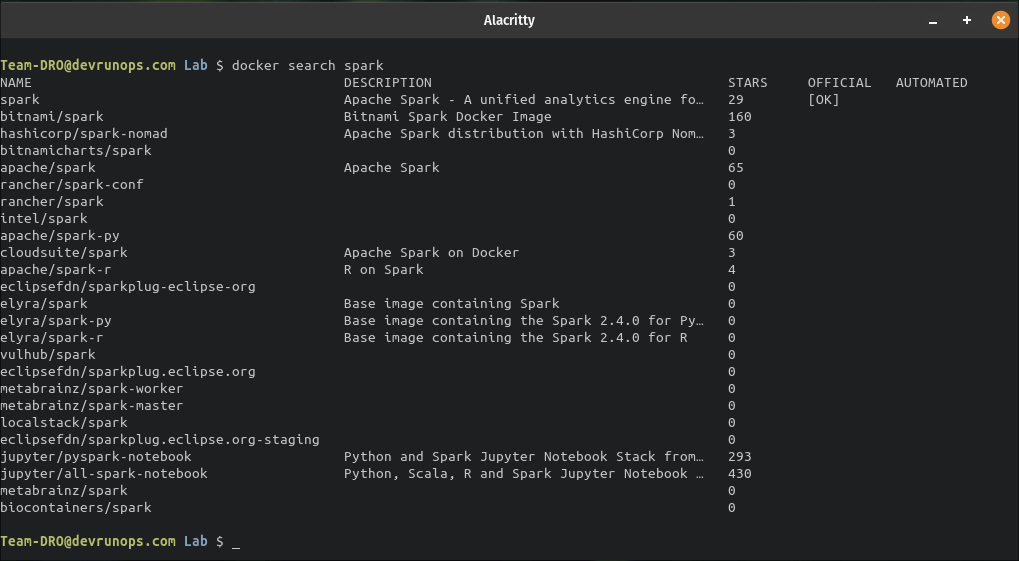
You can either choose the official spark docker image or go with the spark image created and managed by the jupyter community. Here I choose the jupyter spark image which comes with the jupyter notebook setup for spark developnment.
There are two images that you can use
- jupyter/pyspark-notebook – Environment setup for jupyter notebook to work with pyspark.
- jupyter/all-spark-notebook – Environment setup for jupyter notebook along with binaries related to Python, Scala, and R.
$ docker search spark | grep -i jupyter
jupyter/pyspark-notebook                   Python and Spark Jupyter Notebook Stack from…   293
jupyter/all-spark-notebook                 Python, Scala, R and Spark Jupyter Notebook …   430
Pulling Spark Docker Image From Docker Hub
You can straight away use the ‘docker run‘ command which will automatically pull the image and spin up the container. If you wish to pull the image alone then you can run the following command.
$ docker image pull <image-name>   # SYNTAX

$ docker image pull jupyter/all-spark-notebook

...
...
15a3d66e1b80: Pull complete
688c0dcd61fc: Pull complete
ed7d16094f4e: Pull complete
Digest: sha256:b63bae2d9d34779ac969deeb4834efd838991f77269ca9a76bf6b0d1f8678d29
Status: Downloaded newer image for jupyter/all-spark-notebook:latest
docker.io/jupyter/all-spark-notebook:latest
NOTE: By default the latest image will be downloaded. You can also specify a tag to download a particular image.
You can run any of the following commands to check the downloaded spark image.
# Get all images #
$ docker images
$ docker image ls

# Filter spark image #
$ docker images jupyter/all-spark-notebook
REPOSITORY                   TAG       IMAGE ID       CREATED        SIZE
jupyter/all-spark-notebook   latest    0add020fa68c   2 months ago   5.68GB
Create Spark Docker Container From Docker Image
You can use the ‘docker run‘ command to create the spark container from the image. But before creating the container we must discuss port forwarding and mounting volumes.
Port Forwarding – Two particular ports you should know about.
- PORT 8888 – The jupyter notebook listens on port 8888. To connect to the jupyter notebook running inside the container you need to map the port from the local machine to the container.
PORT 8888(HOST) -> PORT 8888(CONTAINER)
- PORT 4040 – The port is used by the spark application master to launch the spark UI. Similar to port 8888 you should also map port 4040 from the container to the local machine.
PORT 4040(HOST) -> PORT 4040(CONTAINER)
RELATED ARTICLE : Docker Networking Concept
When you run multiple spark jobs in parallel, the spark will allocate the next available port for UI. For example, if a spark job is running and listening to port 4040, the next spark job will start listening at 4041. In such cases, you need to map multiple host ports to the container port.
NOTE: In both cases, you can map any available port from the host machine to the container but the container ports should be 8888(Jupyter), 4040(Spark)
Bind Mount – The data stored inside the docker container will be removed once the container is deleted. You can use the bind mount to mount the directory from the host machine inside the container. This way the data remains safe inside your local machine.
RELATED ARTICLE : Docker Volume Management
Now let’s spin up the docker container by running the following command.
$ docker container run -dt \
--name spark-notebook \
-p 8888:8888 \
-p 4040:4040 \
-p 4041:4041 \
--user=root \
-e NB_USER="sparkuser" \
-e CHOWN_HOME=yes \
-e GRANT_SUDO=yes \
-w "/home/sparkuser" \
-e DOCKER_STACKS_JUPYTER_CMD=server \
-v "/home/user/Desktop/spark/notebook:/home/sparkuser" \
jupyter/all-spark-notebook

68e317c7c1fc9bc2203978576e27facf10666d6febf9b878f265bd1282fa35d1
Let’s break down the above command.
- The -dt flag will run the container in detached mode and allocate tty inside the container.
- The --name flag allocates the name to the container. In this case, I named the container spark-notebook.
- The -p HOST:CONTAINER flag will create port forwarding between the host machine and the container. I mapped 8888 for the Jupyter Notebook and 4041,4042 for the Spark application.
- The NB_USER flag will create the given username. By default, a user named jovyan will be present inside the container. Here sparkuser will be created.
- The GRANT_SUDO=yes flag will grant sudo permission to the sparkuser.
- The CHOWN_HOME=yes will switch the ownership for the flag -w “/home/sparkuser”.
- The DOCKER_STACKS_JUPYTER_CMD=server will set the container startup to NONE. By default, the container will start the jupyterlab. This way you can log in to the container and manually start the jupyter process. If you are ok with the default behaviour, you can remove this parameter.
- The -v flag will mount the directory from the host machine inside the container. You need to modify the host directory to point to your directory before running the command. The path /home/sparkuser/ is where your host machine directory will be mounted.
- The name of the container image – jupyter/all-spark-notebook.
REFERENCE LINK: Refer the official link for more container customization
Connect To The Running Spark Container
You can check the status of the launched container by running the docker ps command.
$ docker ps          # Running containers #
$ docker ps -a       # All containers #
To connect to the running container use the docker exec command.
$ docker container exec -it spark-notebook bashSpark Setup Inside The Docker Container
Let’s understand the spark setup inside the container.
- The spark binaries are under the /usr/local/spark directory path.
$ ls -l /usr/local/spark
- The spark-shell, pyspark, and spark-sql are available under the /usr/local/spark/bin directory.
$ ls -l /usr/local/spark/bin/- The conda setup is available under /opt/conda directory path.
$ ls -l /opt/conda/- The jupyter binaries are available under the conda bin directory.
$ ls -l /opt/conda/bin/jupyter*The above directories need to be added to the PATH variable for the sparkuser. If you decide to go with the default user root or jovyan the PATH will already be set properly.
$ sparkuser@1aac1bd7d85a:~$ echo $PATH
/usr/local/sbin:/usr/local/bin:/usr/sbin:/usr/bin:/sbin:/bin:/usr/games:/usr/local/games:/snap/bin

$ echo "PATH=/opt/conda/bin:/opt/conda/condabin:/opt/conda/bin:/usr/local/spark/bin:$PATH" >> ~/.bashrc
$ source ~/.bashrc

$ sparkuser@1aac1bd7d85a:~$ echo $PATH
/opt/conda/bin:/opt/conda/condabin:/opt/conda/bin:/usr/local/spark/bin:/usr/local/sbin:/usr/local/bin:/usr/sbin:/usr/bin:/sbin:/bin:/usr/games:/usr/local/games:/snap/bin
Running Sample Spark Job In Pyspark Shell
To test the spark setup let’s launch the pyspark shell and run sample codes.
$ pyspark

....
....
Spark context Web UI available at http://8e6baf6b07f7:4040
Spark context available as 'sc' (master = local[*], app id = local-1704282738636).
SparkSession available as 'spark'.- The spark application is now running in local mode(local[*]) and you can connect to the UI from your host machine through localhost:4040.
- The spark context is available as sc and the spark session is available as the spark.
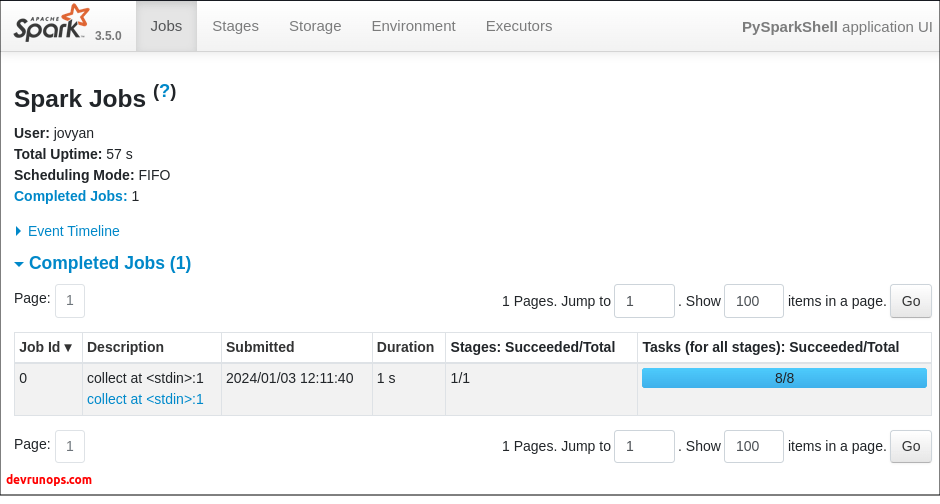
Run the following parallelize method along with the collect() method.
$ sc.parallelize(range(1,15)).collect()You should see the collect job in spark UI as the collect() action is called.
Wrap Up
In this article, we have seen how to set up spark execution environment through the docker container. I also suggest you take a look at our guide on setting Jupyter notebook for spark environment and docker-compose setup for the spark environment.
REFERENCE – https://jupyter-docker-stacks.readthedocs.io/en/latest