

This guide will focus on creating VM and grouping it into a VirtualBox VM group using Vagrant. VirtualBox, a powerful x86 and AMD64/Intel64 virtualization product provides a feature to manage virtual machines (VMs) in groups. VirtualBox allows you to group virtual machines, making it easier to manage multiple VMs. In this guide, I will show you how to create virtual machines through vagrant and group them.
RELATED ARTICLES – Vagrant Articles
Table of Contents
Creating Virtualbox VM Group – Manual Approach
Create Or Add VM To A Virtualbox VM Group
STEP 1 – A default group called ‘ROOT’ will be created by virtualbox and all the VM that you create will be mapped under the ‘ROOT’ group. Have one or more VM created to create a new group.
STEP 2 – Open the virtualbox. In the VirtualBox Manager window, hold down the Ctrl key and click on each VM that you want to include in the group.
STEP 3 – Right-click on one of the selected VMs, choose the ‘Move To Groups’ option and click ‘[New]’ group. Existing VM groups will also be displayed here and you can also select the group instead of the new group. Alternatively, you can also access the same option from the ‘Menu Bar -> Machine -> Move To Group’.
Rename A Virtualbox VM Group
STEP 1 – VirtualBox defaults the new group as “Group”. To rename it, right-click on the group and choose rename. Press ‘Enter’ after typing the new name.
STEP 2 – Alternatively, select “Group” and go to ‘Menu Bar -> Group -> Rename Group’.
Remove A VM From Virtualbox VM Group
As foretold, virtualbox has a default group called ‘ROOT’. Either you can move the VM to a different group or to the root group.
STEP 1 – Select the VM you wish to move.
STEP 2 – Right-click the VM -> Move to group -> [ROOT] group or different group.
Ungroup A Virtualbox VM Group
If you wish to delete the group and move the VM to the [ROOT] group, follow the steps below.
STEP 1 – Select the group you wish to delete.
STEP 2 – Right-click on the group and select ‘ungroup’. Alternatively, you can go to Menu Bar -> Group -> ungroup’.
Start & Stop All VMs in Virtualbox VM Group
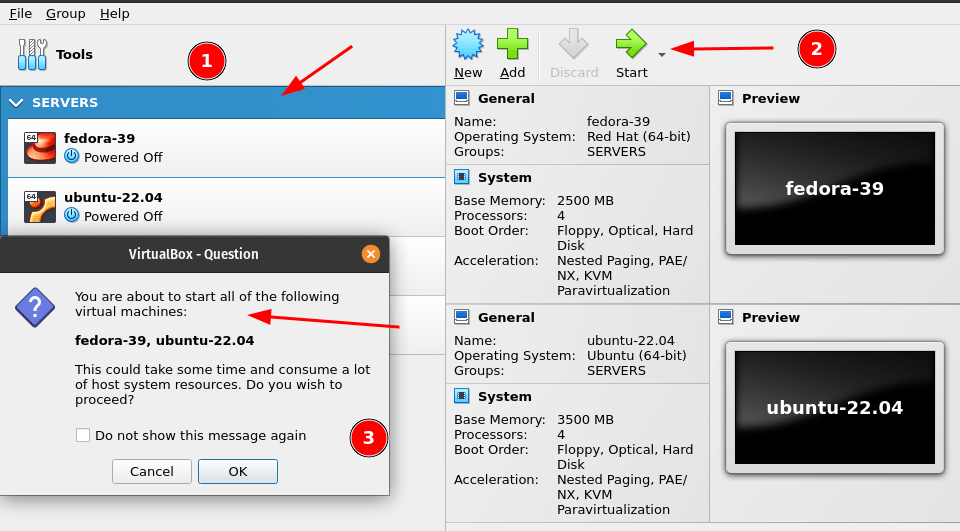
Virtualbox VM group allows you to start and stop all VM at the same time. As you can see in the below image, I have selected the group -> Start VM. It will show you a message before starting multiple VM.
Now that we have seen how to create a VM group in virtualbox, let’s try to implement the same through Vagrant.
Create Virtualbox VM Group Using Vagrant
For demonstration, I will be creating ubuntu/jammy64 a virtual machine with vagrant. You can use different boxes according to your choice.
STEP 1 – Create a new project directory to create vagrantfile.
$ mkdir ubuntu_serverSTEP 2 – Create a minimal vagrant file.
$ cd fedora_server
$ vagrant init -m "ubuntu/jammy64"
STEP 3 – Add the following code to the vagrantfile and run the vagrant up command.
Vagrant.configure("2") do |config|
config.vm.box = "ubuntu/jammy64"
config.vm.box_check_update = false
config.vbguest.auto_update = false
config.vm.define "ubuntu" do |ubvm|
ubvm.vm.hostname = "ubuntu22"
ubvm.vm.provider "virtualbox" do |vbox|
vbox.name = "ubuntu-server"
vbox.customize ["modifyvm", :id, "--groups", "/LINUX_SERVER"]
end
end
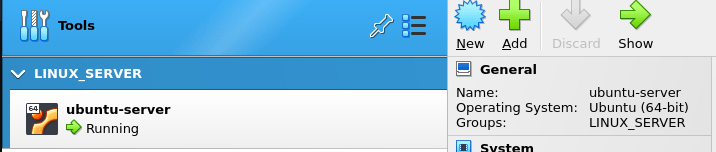
endThe VM will be created and grouped under the LINUX_SERVER group.
Below is the code that groups the VM. Use the same syntax and replace the “/LINUX_SERVER” with your name. As foretold, the default group is the ‘ROOT’ group. All other groups you create will be under the root group. Hence we are adding a “/” to the group name.
ubvm.vm.provider "virtualbox" do |vbox|
  vbox.customize ["modifyvm", :id, "--groups", "/LINUX_SERVER"]
end
Create Virtualbox VM Sub Group Using Vagrant
You can also create a subgroup which is nothing but a group inside a group.
STEP 1 – Create a new project directory.
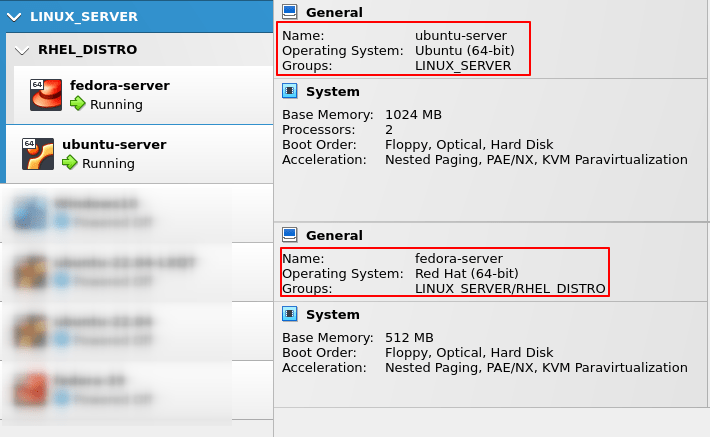
$ mkdir multi_vmSTEP 2 – Add the following code to the vagrant file. The below vagrantfile will create two VM. The Ubuntu VM will be grouped under /LINUX_SERVER and the Fedora VM will be grouped under /LINUX_SERVER/RHEL_DISTRO.
Vagrant.configure("2") do |config|

  config.vm.box_check_update = false
  config.vbguest.auto_update = false

  # Ubuntu VM #
  config.vm.define "ubuntu" do |ubvm|
    ubvm.vm.box = "ubuntu/jammy64"
    ubvm.vm.hostname = "ubuntu22"
    ubvm.vm.provider "virtualbox" do |vbox|
      vbox.name = "ubuntu-server"
      vbox.customize ["modifyvm", :id, "--groups", "/LINUX_SERVER"]
    end
  end

  # Fedora VM #
  config.vm.define "fedora" do |fvm|
    fvm.vm.box = "fedora/39-cloud-base"
    fvm.vm.hostname = "fedora39"
    fvm.vm.provider "virtualbox" do |vbox|
      vbox.name = "fedora-server"
      vbox.customize ["modifyvm", :id, "--groups", "/LINUX_SERVER/RHEL_DISTRO"]
    end
  end

end
STEP 3- Run the vagrant up command to create both the VM. Once the VM is created, navigate to your virtualbox and you will see the group and subgroup as per the above vagrantfile.
STEP 4 – Run the vagrant ssh command to connect to the VM.
$ vagrant ssh ubuntu # ubuntu VM
$ vagrant ssh fedora # fedora vm
To remove single or multiple VM run the following commands.
- Stop all the running VM.
$ vagrant halt- Destroy the disk and virtual machine.
$ vagrant destroy
    fedora: Are you sure you want to destroy the 'fedora' VM? [y/N] y
==> fedora: Destroying VM and associated drives...
    ubuntu: Are you sure you want to destroy the 'ubuntu' VM? [y/N] y
==> ubuntu: Destroying VM and associated drives...
Alternatively, you can also force the destroy operation without prompting for confirmation.
$ vagrant destroy -fWrap Up
In this guide, we have seen how to create new groups directly in the virtualbox and as well as through vagrant. We have also seen how to create subgroups too. This feature is provider-dependent and only available in virtualbox.