In this article, you will learn how to work with python’s built-in virtual environment named venv.
First, let’s understand the necessity for virtual environments in python. The virtual environment creates an isolated environment where you can maintain project-level dependencies avoiding any dependency conflict with other projects.
Let’s take an example to understand the term “dependency conflict”. When you install any packages to python they will be installed in the global “site-packages” directory. Let’s say I am working on project A where my project is dependent on tabulate module with version 0.8.8. Without the virtual environment, the tabulate module will be installed under the site-packages directory and available globally across your machine. Again I started working on project B which requires tabulate version 0.9.0. If I install or upgrade the tabulate version to 0.9.0 project A will get affected since it has a dependency on version 0.8.8.
Another issue with the default approach is dependency conflict with system tools. By default, the linux environment comes with python installed, and the operating system and other tools use python. When you upgrade your system these modules may be upgraded to different versions which will break your application.
In the upcoming sections, you will learn how virtual environments address these issues by creating isolated environments.
Create Python Virtual Environment
To create the virtual environment you need the venv module which ships by default with python from version 3.5. Run the following command to access the venv module help section.
$ python3 -m venv --help
$ python3 -m venv -h
The virtual environment is just a directory/folder that has symlinks to base python binaries. The following command will create python virtual environment.
$ mkdir ~/python
$ python3 -m venv .venv
Here .venv is the virtual environment directory. You can create the virtual environment with any name but naming it as venv or .venv is a standard convention.
Activate & Deactivate Python Virtual Environment
Inside the .venv/bin/ directory, you have activation scripts for different shells and operating systems.
$ ls .venv/bin/[Aa]*
.venv/bin/Activate.ps1
.venv/bin/activate
.venv/bin/activate.csh
.venv/bin/activate.fish
Run the following command to activate the environment in linux and macOS.
# bash
$ source .venv/bin/activate

# csh
$ source .venv/bin/activate.csh

# fish
$ source .venv/bin/activate.fish
In the windows operating system, you will not have the .venv/bin folder instead you will have the .venv/scripts folder.
$ .venv\Scripts\activateOnce the virtual environment is activated you will see your terminal prompt prepends the virtual environment name in brackets.
nixzie@667f6087d140:~/python$ source .venv/bin/activate
(.venv) nixzie@667f6087d140:~/python$
You can also set a different name for the terminal prompt by setting the –prompt flag.
$ python3 -m venv .venv --prompt "First_project"
$ source .venv/bin/activate
(First_project) nixzie@667f6087d140:~/python$
You can run the env command in the bash shell to check virtual environment-related variables.
$ env | grep -i "virtual_env*"
VIRTUAL_ENV=/home/nixzie/python/.venv
VIRTUAL_ENV_PROMPT=(First_project)
To deactivate the virtual environment, type “deactivate”. The terminal prompt will be back to a previous state before activation.
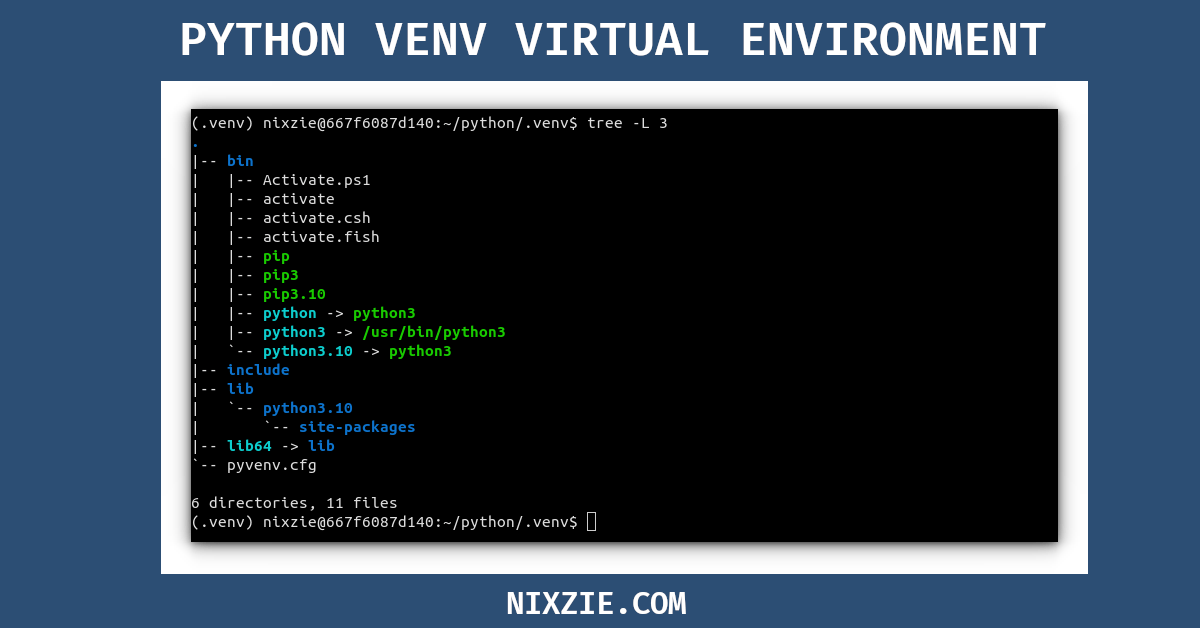
$ deactivatePython Virtual Environment Directory Structure
Below is how the virtual environment directory structure looks like.

BIN Directory
Under the bin directory the activation scripts, pip, and python binaries will be available.
1. Python Interpreter
You can launch the python interpreter by typing “python” in the terminal. When you run the activation script, the virtual environment path is added as the first path in the shell $PATH variable.
# Before Activation
$ echo $PATH
/usr/local/sbin:/usr/local/bin:/usr/sbin:/usr/bin:/sbin:/bin:/usr/games:/usr/local/games:/snap/bin


# After Activation
$ echo $PATH
/home/nixzie/python/.venv/bin:/usr/local/sbin:/usr/local/bin:/usr/sbin:/usr/bin:/sbin:/bin:/usr/games:/usr/local/games:/snap/bin
Under the .venv/bin/ directory, you will have the python interpreter which are symlinks to the base python interpreter(/usr/bin/python3). From within the virtual environment, you can either type “python”, “python3”, or “python3.10” to start the interpreter since all these are symlinks to the base interpreter.
2. Python Package Manager – PIP
Pip is configured with the virtual environment which is necessary to manage your packages. The venv module uses ensurepip to bootstrap the pip. Behind the scene when you initialize the virtual environment the ensurepip module will take the pip wheel that comes with CPython and put it into your virtual environment.
Under the bin directory, if you see the pip binaries are not symlinked to the base python-pip binary. You can run the pip command by calling either “pip”, “pip3”, or “pip3.10”.
$ ls -l bin/ | grep "pip"
-rwxrwxr-x 1 nixzie nixzie  242 Feb 20 16:33 pip
-rwxrwxr-x 1 nixzie nixzie  242 Feb 20 16:33 pip3
-rwxrwxr-x 1 nixzie nixzie  242 Feb 20 16:33 pip3.10
You can upgrade the pip to the latest version during the initialization by passing “–upgrade-deps” flag
$ python3 -m venv .venv --upgrade-deps

Requirement already satisfied: pip in ./.venv/lib/python3.10/site-packages (22.0.2)
Collecting pip
  Downloading pip-23.0.1-py3-none-any.whl (2.1 MB)
     ━━━━━━━━━━━━━━━━━━━━━━━━━━━━━━━━━━━━━━━━ 2.1/2.1 MB 2.0 MB/s eta 0:00:00
Requirement already satisfied: setuptools in ./.venv/lib/python3.10/site-packages (59.6.0)
Collecting setuptools
  Downloading setuptools-67.3.2-py3-none-any.whl (1.1 MB)
     ━━━━━━━━━━━━━━━━━━━━━━━━━━━━━━━━━━━━━━━━ 1.1/1.1 MB 4.5 MB/s eta 0:00:00
Installing collected packages: setuptools, pip
  Attempting uninstall: setuptools
    Found existing installation: setuptools 59.6.0
    Uninstalling setuptools-59.6.0:
      Successfully uninstalled setuptools-59.6.0
  Attempting uninstall: pip
    Found existing installation: pip 22.0.2
    Uninstalling pip-22.0.2:
      Successfully uninstalled pip-22.0.2
Successfully installed pip-23.0.1 setuptools-67.3.2
You can also create a virtual environment without installing PIP by adding the “–without-pip” flag.
3. INCLUDE Directory
The .venv/include directory will be empty. It will store C lang header files when you install any python packages that have a dependency on the C lang extension.
4. LIB Directory
Any package you install after activating the virtual environment will be installed under the “.venv/lib/python3.10/site-packages/” directory. If you check the site-packages directory after creating the virtual environment, it only contains the setuptools and pip.
$ ls
_distutils_hack  distutils-precedence.pth  pip  pip-22.0.2.dist-info  pkg_resources  setuptools  setuptools-59.6.0.dist-info
Go ahead and install some modules inside the virtual environment. Here I am installing tabulate module.
$ pip install tabulate==0.8.9
Collecting tabulate==0.8.9
  Downloading tabulate-0.8.9-py3-none-any.whl (25 kB)
Installing collected packages: tabulate
Successfully installed tabulate-0.8.9
Files related to the tabulate module will be available under the “.venv/lib/python3.10/site-packages/” directory and related binaries will be installed under the “.venv/bin/” directory.
$ ls -l lib/python3.10/site-packages/ | grep -i tabulate
drwxrwxr-x 2 nixzie nixzie  4096 Feb 20 18:45 tabulate-0.8.9.dist-info
-rw-rw-r-- 1 nixzie nixzie 62917 Feb 20 18:45 tabulate.py

$ ls -l bin/ | grep -i tabulate
-rwxrwxr-x 1 nixzie nixzie  230 Feb 20 18:45 tabulate
When you import modules, python uses the sys.path attribute to locate the module. If the module is not found in any of the available directory paths “Module not found” error will be thrown. In the virtual environment, the sys.path is modified to include the “.venv/lib/python3.10/site-packages/” directory.
Run the following python one-liner to check the sys.path attribute.
$ python -c "import sys, pprint; pprint.pprint(sys.path)"
['',
 '/usr/lib/python310.zip',
 '/usr/lib/python3.10',
 '/usr/lib/python3.10/lib-dynload',
 '/home/nixzie/python/.venv/lib/python3.10/site-packages']
5. PYENV.CFG Configuration File
The pyenv.cfg under the .venv directory stores configuration related to the virtual environment. This file is automatically created when the virtual environment is initialized.
$ cat pyvenv.cfg
home = /usr/bin
include-system-site-packages = false
version = 3.10.6
prompt = 'First_project'
Now you should have a fair understanding of how the virtual environment is structured.
Access To System Site Packages
You can grant access to system site packages when creating the virtual environment using “–system-site-packages” flag. By including the system site packages you can use existing modules and any new module you install will be installed under the virtual environment site packages directory.
$ cat .venv/pyvenv.cfg | grep packages
include-system-site-packages = true
Run the following command and you can see along with virtual environment site packages, system level dist-packages directory is also added to sys.path.
$ python -c "import sys, pprint; pprint.pprint(sys.path)"
['',
 '/usr/lib/python310.zip',
 '/usr/lib/python3.10',
 '/usr/lib/python3.10/lib-dynload',
 '/home/nixzie/python/.venv/.venv/lib/python3.10/site-packages',
 '/usr/local/lib/python3.10/dist-packages',
 '/usr/lib/python3/dist-packages']
Replicate The Virtual Environment To Another Environment
As said in the introduction section dependency isolation is an important feature the virtual environment offers. You can export the list of packages for this particular package using the “requirements.txt” file and replicate it easily on some other machine.
$ pip freeze > requirements.txt
(.venv)$ cat requirements.txt
tabulate==0.9.0
In another machine run the following command to replicate the environment.
$ python3 -m venv .venv
$ pip install -r requirements.txt
Python Virtual Environment With Version Control
The virtual environment should not be included with your version control system like git. You should add the virtual environment directory to the .gitignore file.
RELATED ARTICLE – https://devrunops.com/git-vcs-what-is-the-use-of-the-gitignore-file/
If you are creating a central repository using a product like github, you have the option to include the .gitignore file specific to python. You can check the following link for predefined gitignore for python.
REFERENCE FILE – https://github.com/github/gitignore/blob/main/Python.gitignore
Wrap Up
By this time you should have a fair understanding of the virtual environment in python and what problem it solves. I would not say this is a perfect dependency management tool but it does the job in most cases.