In this article, you will learn how to easily set up an ansible lab using the docker and docker-compose plugins. I will walk through in detail about each lab configuration and you can extend this lab if needed to fit your needs.
Ansible Architecture Components
Let’s refresh a few ansible terms before diving into the lab setup.
CONTROLLER NODE: Node or a container where the ansible binaries will be installed. This node is called as controller node or master node.
MANAGED NODES: Node or container where the task will be executed. The ansible binaries will not be installed on the managed nodes.
CONNECTION PLUGINS: Plugins extend the ansible functionality and ansible by default comes with some important plugins. One such plugin is the connection plugin. Ansible uses ssh protocol to connect to managed nodes and executes the task. This is achieved through the ssh connection plugin.
You can use the following command to get the list of plugins installed.
$ ansible-doc -t connection -lINVENTORY: List of hosts defined in YAML or INI format where the task will be executed against.
CONFIGURATION FILE: All ansible related configurations will be added to the ansible.cfg configuration file. This file can be configured globally or per project.
PLAYBOOK: A YAML file where the tasks are defined. Ansible runs all the tasks called plays against the defined host in the inventory.
Prerequisites
To set up the lab you need to install the docker and docker-compose plugin. Refer to the official documentation to complete the docker setup before proceeding to the next step.
https://docs.docker.com/engine/install/
Understanding The Lab Structure
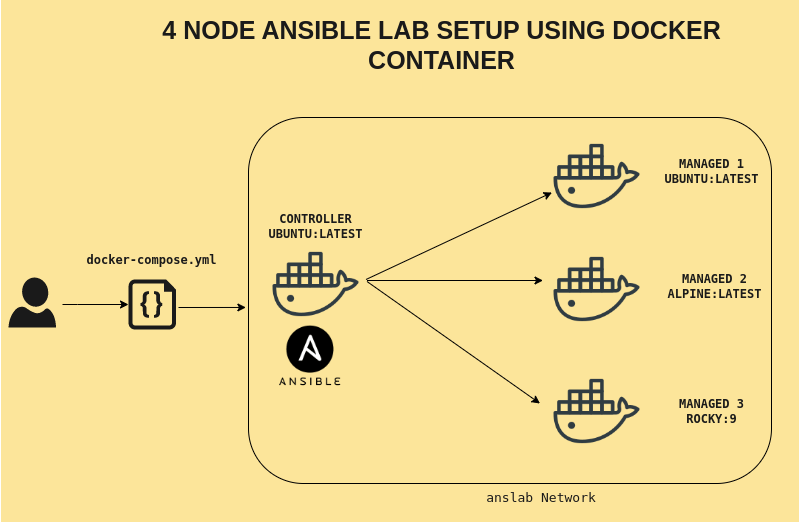
The following image will give you a good idea of the lab structure. A total of four containers will be launched using the docker-compose.yml file where one container will act as the controller host and the remaining three containers will act as managed hosts.

Clone the repository from github.
$ git clone https://github.com/KarthickSudhakar/Docker_Ansible_lab_Setup ansible_labBelow is how the project files are structured.
$ nixzie@home-lab:~/ansible_lab$ tree .
.
├── alpine
│   └── Dockerfile
├── docker-compose.yml
├── README.md
├── rocky
│   └── Dockerfile
├── script
│   ├── bootstrap.sh
│   └── entrypoint.sh
└── ubuntu
    └── Dockerfile

4 directories, 7 files
Dockerfile – Container Build Instruction
Each container will be built using its respected dockerfile. If you look at the repository there will be three directories for different distributions and each directory contains a docker file where instructions on how to build the container are given.
nixzie@home-lab:~/ansible_lab$ tree ubuntu/ alpine/ rocky/
ubuntu/
└── Dockerfile
alpine/
└── Dockerfile
rocky/
└── Dockerfile
Each docker file does the following actions.
- Pull the base image from the docker hub if not available locally.
- Create a user named ansuser and set the password for the user. The ansuser is added to the sudo and wheel group in respective containers. Password for both root user and ansuser is set to “password123”.
- Install openSSH-server on the ubuntu container alone few more supporting packages like sudo, jq, net-tools, etc. on all the containers.
- Port 22 is exposed across all containers.
- SSH daemon will be started when the container is started.
Once the container images are built you should see the containers with the following name.
anslab/controller
anslab/rocky
anslab/alpine
Docker Compose File – Build The Lab
The lab will be orchestrated using the docker-compose file. If you look at the docker-compose file it contains four sections where the instruction related to building and running the container is given.
Below is the instruction for a single container and the instruction for three other containers is the same.
1. First it will check for the docker file under “dockerfile: ubuntu/Dockerfile” and run the build process.
2. The image will be created with the name defined using “image:”.
3. The container will then be created using the name given in “container name:”.
4. Container will get attached to ansible_network.
5. The pull_policy property decides where the containers should be pulled from. Setting it to “build” will run the build through dockerfile.
6. If you wish to mount any of your local directories inside the container then you can uncomment the volumes section and replace the file system path.
 controller:
    build:
      context: .
      dockerfile: ubuntu/Dockerfile
    image: anslab/controller
    container_name: anscontroller#     volumes:#       - /home/nixzie/Documents/project:/home/ansuser/project    networks:
      - ansible_network
    pull_policy: build
The last section of the docker file contains the network definition. A bridge network named anslab will be created and all the containers will be part of this network.
networks:
  ansible_network:
    driver: bridge
    name: anslab
Enough with the lab structure. Now let me show you how to start the containers. It is pretty simple and all you have to do is run the following command.
$ docker-compose up -dIt will take some time to build and start the containers for the first time.
Ansible Installation Using Bootstrap Script
connect to the controller host by running the following command.
$ docker container exec -it anscontroller bashInstalling ansible latest version and setting up the ssh key between the controller and managed host is taken care of by the bootstrap script. This script is located under scripts/bootstrap.sh in the repository. This script will be copied to the ubuntu container when the image is created.
Switch as ansuser and run the script.
$ su - ansuser
$ bash ~/bootstrap.sh
This script will also take care of creating a sample project and run the adhoc command against all the hosts to verify the ssh key-based connection. checkout for /home/ansuser/sample_project.
++ Generating ansible.cfg file
++ Generating hosts file file

ansubuntu | CHANGED | rc=0 | (stdout) PRETTY_NAME="Ubuntu 22.04 LTS"
anscontroller | CHANGED | rc=0 | (stdout) PRETTY_NAME="Ubuntu 22.04 LTS"
ansrocky | CHANGED | rc=0 | (stdout) PRETTY_NAME="Rocky Linux 9.0 (Blue Onyx)"
ansalpine | CHANGED | rc=0 | (stdout) PRETTY_NAME="Alpine Linux v3.17"
Now the lab setup is completed. Let me summarize what I have done here in three steps.
- Clone the repository from github.
- Run the docker-compose up command to set up the lab.
- Connect to the controller container and run the bootstrap.sh script.
Manage The Container Lifecycle
The following commands will help you to maintain the container lifecycle.
If you are creating the container for the first time run the following command. By default, it will be created in attached mode. Add the “-d” flag for detached mode.
# Attached mode
$ docker-compose up

# Detached mode
$ docker-compose up -d
To remove the built containers run the following command.
$ docker-compose downCheck the status of containers using any of the following commands.
# docker-compose commands
$ docker-compose ps
$ docker-compose ls
To start and stop existing containers run the following command.
$ docker-compose start
$ docker-compose stop
To view, the logs run the following command.
$ docker-compose logsWrap Up
In this article, we have seen how to set up 4 node ansible lab using docker containers. We have also seen some of the docker-compose commands to manage the life cycle of the containers. You can fork the repository and modify it to fit your needs.