

In this article, I will show you how to set up the Ansible extensions in Visual Studio Code for Ansible development.
Visual Studio Code aka VSCode is a popular integrated development environment with some impressive capabilities. The real power of VSCode comes from its built-in debugging support, native Git integration, powerful extensions, organizing projects with workspaces and profiles, settings sync, markdown support, and many more.
Redhat team has created an official Ansible plugin for Visual Studio code. You will get a combined experience of VSCode features along with ansible plugin features. The Ansible plugin supports the following features.
- Syntax highlighting.
- Syntax validation through ansible-linter plugin.
- IntelliSense support.
- Auto closing JINJA expression.
- Documentation reference when you move the mouse over the module.
- Open module code from within the playbook.
- Support for both ansible-playbook and ansible-navigator.
- Reusable terminals.
- Support for fully qualified collection names(FQCN).
- Ansible Lightspeed Integration
You will learn more about these features in the upcoming sections.
I believe you already have Visual Studio Code installed on your machine. You can also refer to the following article to install Visual Studio Code on Linux operating systems.
RELATED ARTICLE – How To Install Visual Studio Code(VSCode) In Different Linux Distributions
Vscode Extensions For Ansible Development
The following extensions will help you set up the Ansible development environment in Visual Studio code.
- Redhat YAML Extension – Under the extensions, search for YAML. You will get a lot of extensions related to YAML, choose the extension from Red Hat. This extension is not specific to Ansible but can be used to work with YAML files. It uses a YAML language server to provide support for YAML validation, Auto-completion, Hover support, Formatting, etc.

- Redhat Ansible Extension – Search for the Ansible extension from redhat and install it. This extension provides all-out support for your Ansible development starting from auto-completion, linting support, documentation references, jump to code, AI assistant with IBM Watson code, etc.

- Ansible Linter – Ansible extension requires the ansible-linter package to provide linting support from within vscode. The ansible-linter can be installed through pip and can also be used outside vscode as a standalone command. Launch your terminal and run the following command to install ansible-lint. In my case, I am installing ansible lint inside a python virtual environment.
$ pip install ansible-lint- Remote Development – The remote development extension has 4 extension packs that let you connect to the remote server for development work. Sometimes you will have the VSCode installed on your desktop but the development environment will be on a server or in the cloud environment. In such cases, you can use the remote development plugin, install vscode extensions on the remote server, and do the development activity. The extension also supports containers and Windows subsystems for linux(WSL).
NOTE: You can also install any of the 4 extension packs as a standalone extension.

Ansible VScode – Create A Sample Project
I have created a sample project in a Python virtual environment for demonstration purposes. You can run the following commands to create the virtual environment and install Ansible.
RELATED ARTICLE – How To Create Virtual Environments In Python
# Create project directory
$ mkdir ~/vscode-setup

# Initialize virtual environment
$ python3 -m venv ~/vscode-setup/.venv

# Activate virtual environment
$ source ~/vscode-setup/.venv/bin/activate

# Install ansible
$ pip install ansible
Create a directory named project where you will add the playbook or roles.
$ mkdir ~/vscode-setup/project/Under the project directory create a file called hosts and add the managed node host names. In my case, it’s just localhost.
# hosts file
localhost
Create ansible.cfg file under the project directory and add the following configurations.
[defaults]
inventory = hosts
host_key_checking = False
nocows = 1
ansible_python_interpreter=/usr/bin/python3
actions_warnings = False
Now go to vscode -> File menu -> Add folder to workspace -> select the vscode-setup directory. VScode workspace allows you to organize multiple folders into a project-like structure and you can create settings dedicated to this workspace alone. When you add a folder to the workspace it will be named as UNTITLED WORKSPACE.
To save the workspace go to File -> Save Workspace As -> File Name. Now the workspace will have the same name as the saved file.

Two Different Ways To Modify VSCode Ansible Settings
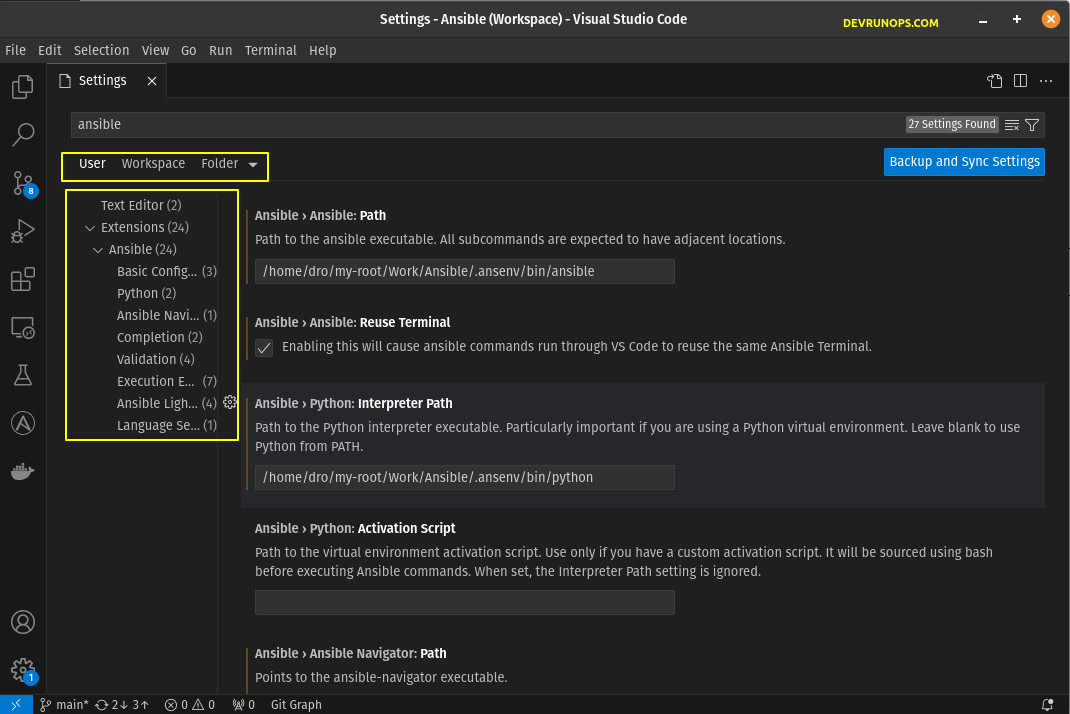
Open the settings by pressing the “CTRL + ,” shortcut key. Type “ansible” in the search bar which will show the parameters related to ansible.
You can store configurations at three levels.
- USER – Settings are applied globally.
- WORKSPACE – Settings are applied only to the particular workspace.
- FOLDER – Settings are applied at the folder level.
NOTE: It is recommended to create a separate workspace for your project and store the configurations at the workspace level. This way you can create project-level configurations for multiple Ansible projects without conflicts.
You can either modify the parameters directly from the UI or you can modify the settings.json file.
If you wish to add settings to your settings.json file, you need the corresponding settings ID. You can get the ID of the setting by clicking the small settings icon and selecting ‘Copy Setting ID’ which will copy the ID to the clipboard. You can then paste the ID into your settings.json file.

1. Accept/Deny Usage Data
Both YAML and Ansible Redhat plugins collect usage data and send it to redhat. When you create your first YAML file, you will be prompted to accept or deny sending the usage data to redhat. Based on your preference click the accept or deny button.
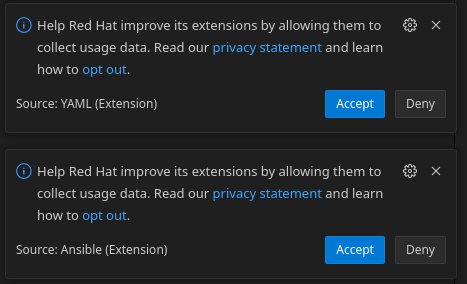
There is also a section for telemetry in the Ansible plugin which allows you to enable or disable sending usage data.

Alternatively, you can directly add the following configuration to the settings.json file to enable or disable the telemetry.
| “redhat.telemetry.enabled”: true # Enable telemetry “redhat.telemetry.enabled”: false # Disable telemetry |
2. VSCode Ansible Language Mode
VScode automatically detects the file based on the extension. When I open the ansible-playbook which is a YAML file with a .yaml or .yml extension it will assign the language mode to YAML but not to ansible.

You should set the language mode to ansible for the ansible plugin to be activated for the particular YAML file. Click the language mode from the status bar which will give you options to set the language mode. Choose ‘Ansible’.

Now the Ansible plugin will be activated. Now you have to set the Python environment.

Click on the ‘select python environment’ from the status bar which will give you different python interpreters to choose from.

Now the Python interpreter will be set. In a later section, I will show you how to set the Python interpreter path through the Ansible plugin configuration.

You can add the ansible yaml file association type in the settings.json file. The language mode will be set as ansible for any files with .yml and .yaml extensions.
| “file.associations”: { “*.yml”: “ansible”, “*.yaml”: “ansible”, } |
3. Set Ansible Executable Path In VSCode Ansible Plugin
The first configuration you will find in the Ansible extension is the path to the Ansible executable. Provide the absolute path to the ansible binary.

4. Enable Fully Qualified Collections Name(FQCN)
This option will enable the plugin to use the FQCN instead of just using the plugin name.

You can see the differences in the following images. The following image shows the IntelliSense when FQCN is disabled. When I type dnf it only displays the module name. If you press the tab key it will just expand to the module name.

The following image shows the IntelliSense when FQCN is enabled.

5. Python Interpreter Settings For Ansible Plugin
There are two configurations related to the Python interpreter path. By default, the plugin will search the path under the PATH variable and find the Python interpreter. If you have installed Ansible and Python in a virtual environment then you have to provide the absolute path to the Python interpreter.
If you have a custom activation script add it to the Activation Script parameter. This will ignore the Python interpreter path setting.
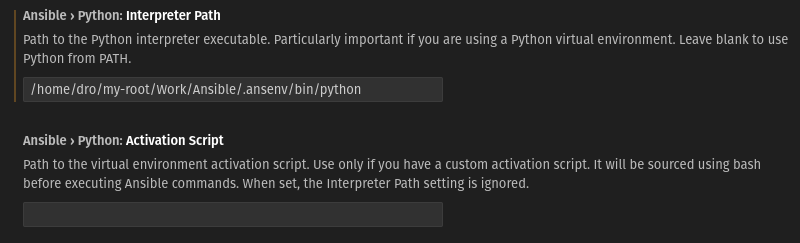
Now when you launch the VSCode builtin terminal, it will automatically run the virtual environment activation script based upon the interpreter path we set.
6. Ansible navigator Path
Ansible navigator is a TUI-based command line tool that helps you to create, run, and troubleshoot Ansible content. If you are using ansible-navigator you can set the absolute path to ansible-navigator binary here.

7. Playbook Validation With Ansible Plugin
Under the validation, you can choose to enable or disable linting support and set the ansible linter path. As foretold ansible plugin uses ansible-lint package to do validation inside vscode. Here I have added the absolute path of ansible-lint binary.
If you wish to disable linitng remove the checkbox under ‘Validation: Enabled’. In this case, the plugin will run the ‘ansible-playbook –syntax-check’ command alone.
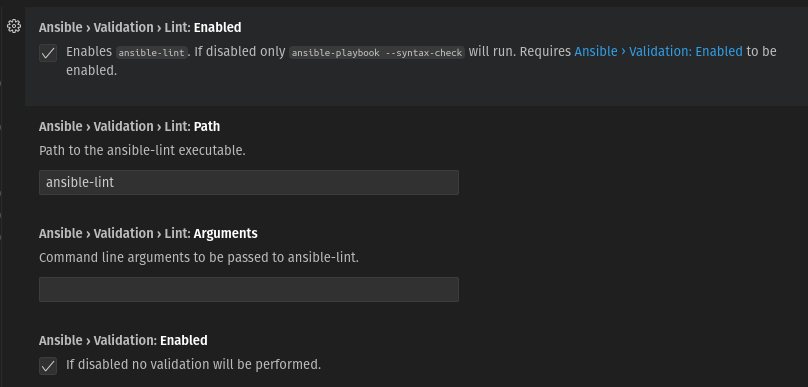
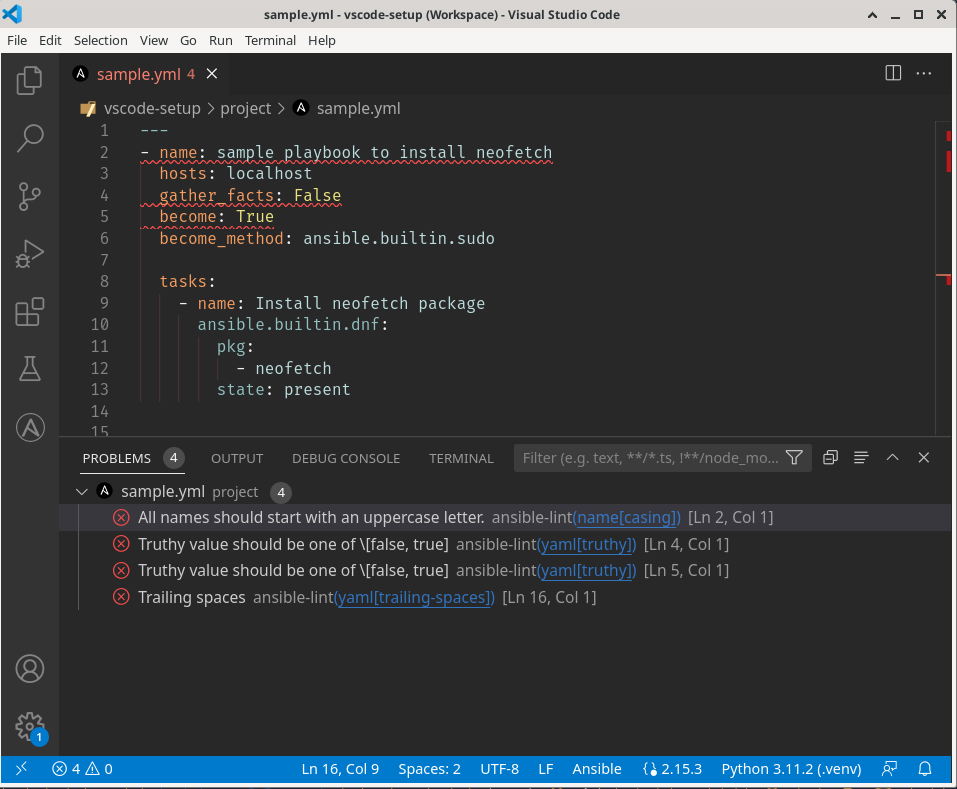
When you save the playbook, the linter will analyze for any potential errors and display it under the PROBLEMS section.
8. Ansible Lightspeed
Ansible lightspeed is a generative AI feature that uses IBM Watson studio. If you enable the lightspeed option it will take you to the redhat login page for authentication. You can use the lightspeed once the login is successful.

9. Ansible Plugin Language Server
The language server option is for debugging purposes. You can trace the communication between the VSCode editor and the Ansible language server by enabling this option.

Running Ansible Playbook Through VSCode
There are two ways to run the playbook in VSCode.
Using Integrated terminal – Traditionally we will submit the playbook with ansible-playbook or ansible-navigator commands directly from the terminal.
Ansible Plugin Feature – You can right-click on any YAML file and you will see an option to submit the playbook through ansible-navigator and ansible-playbook command. Based on the selection, the integrated terminal will be automatically launched and the playbook will be submitted.

You have to enable the reuse terminal settings if you are going to run the playbook through the right-click option. This option will prevent a new terminal session from being used for every playbook submission.

Wrap-Up
Now you should have a good understanding of some of the capabilities that Ansible plugins for vscode offer. Let us know if you have any productive hacks with the Ansible plugin in the comment section.